Arduino Programming Basic - Data Type
Arduino 程序基础,介绍Arduino程序的基本组成,第一部分编写了10个例子,关于变量及变量名称,串口监视器,if循环,for循环,while循环等。第二部分介绍了函数,全局变量,局部变量和静态变量,数据类型,Bollean运算,注释语句等。
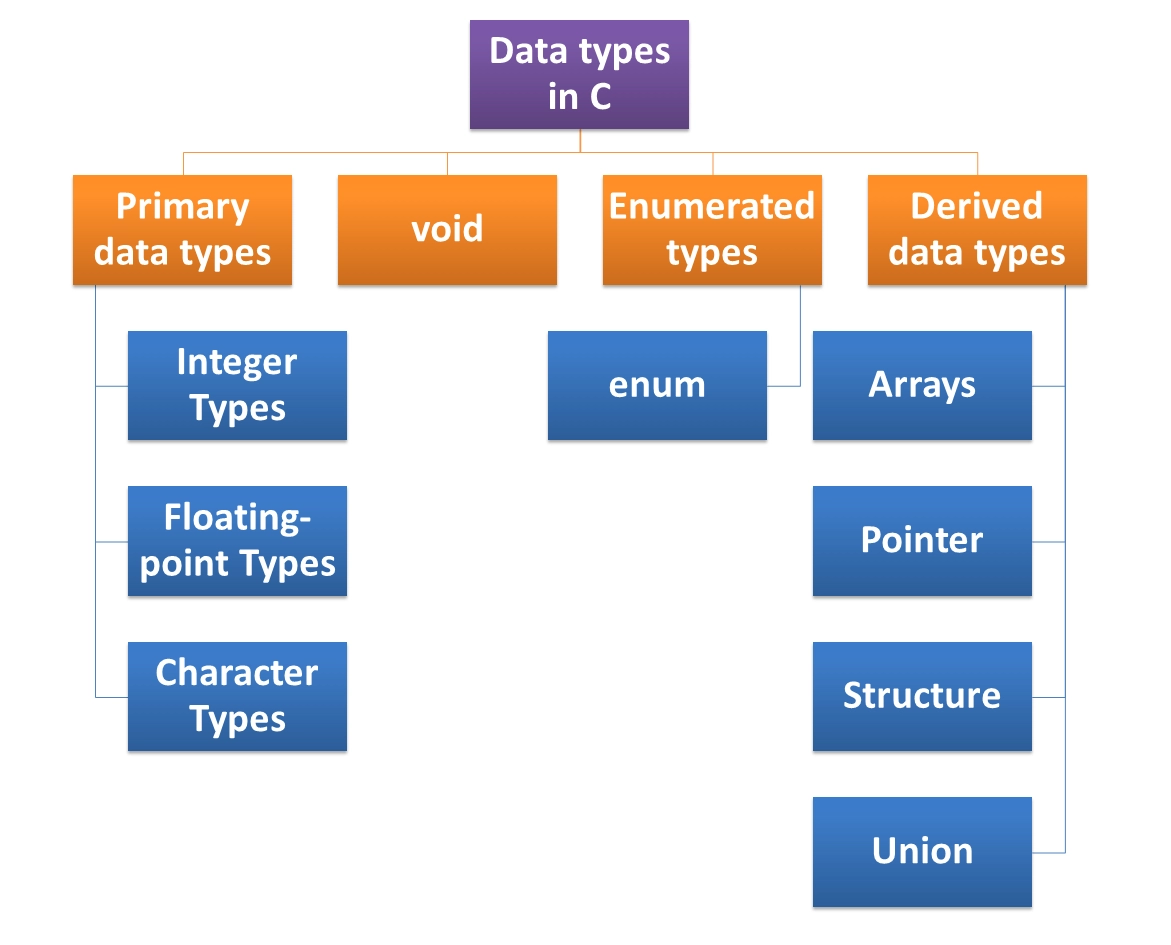
数据类型
boolean 占用内存(字节)1,范围: 0或1
char 占用内存(字节)1,范围: -128~+128
byte 占用内存(字节)1,范围: 0~255
int 占用内存(字节)2,范围: -32768~+32767
unsigned int 占用内存(字节)2,范围: 0~+65536
long 占用内存(字节)4,范围: -2147483648~+2147483647
unsigned long 占用内存(字节)4,范围: 0~+4294967295
float 占用内存(字节)4,范围:-3.4028235E+38~+-3.4028235E+38
double 占用内存(字节)4,和float 一样
int 整型数据
int ledpin=10;
float 浮点数据
f=c*9/5 +32
float centToFaren(float c)
{
float f= c*9.0/5.0+32.0 ;
return f;
}
char 字符型数据
char ch='A';
printf("The number of %c is  %d . \n" ,ch ,ch);
String 字符串
char site[7] = {'A', 'U', 'T', 'A', 'B', 'A', '\0'};  // use ' define


char site[] = "AUTABA";   // use " define
Array 数组
char name[ ]= { "Tom", "Jimmy","Linda","Ron" };
int  score[ ]= {99,100,95,89};
定义整型数组( Save Our Souls - "SOS" Code 3-1):
int durations[] = {200,200,200,500,500,500,200,200,200};
int ledPin = 13 ;
int durations[] = {200,200,200,500,500,500,200,200,200};
void setup()
{
 Serial.begin(9600);
 for ( int i=0; i<9; i++)
 {
      Serial.println(durations[i]);
}
}
void loop( )
{
}
调用字符数组的内容 3-1a
int ledPin = 13 ;
int durations[] = {200,200,200,500,500,500,200,200,200};
void setup()
{
  pinMode(ledPin,OUTPUT);
}

void loop( )
{
for ( int i=0; i<9; i++)
  {
      flash(durations[i]);
   }
delay(1000);
}

void flash(int delayPeriod)
{
  digitalWrite(ledPin,HIGH);
  delay(delayPeriod);
  digitalWrite(ledPin,LOW);
  delay(delayPeriod);
}
字符串 3-2
const int dotDelay = 200;
const int ledPin = 13;
char* letters[] = {
".-", "-...", "-.-.", "-..", ".", "..-.", "--.", "....", "..",
// A-I
".---", "-.-", ".-..", "--", "-.", "---", ".--.", "--.-", ".-.",
// J-R
"...", "-", "..-", "...-", ".--", "-..-", "-.--", "--.."
// S-Z
};
char* numbers[] = {"-----", ".----", "..---", "...--", "....-",
".....", "-....", "--...", "---..", "----."};
void setup()
{
pinMode(ledPin, OUTPUT);
Serial.begin(9600);
}
void loop()
{
   char ch;
   if (Serial.available() > 0)
   {
    ch = Serial.read();
    if (ch >= 'a' && ch <= 'z')
     {
      flashSequence(letters[ch - 'a']);
     }
    else if (ch >= 'A' && ch <= 'Z')
     {
      flashSequence(letters[ch - 'A']);
     }
    else if (ch >= '0' && ch <= '9')
     {
      flashSequence(numbers[ch - '0']);
     }
    else if (ch == ' ')
     {
      delay(dotDelay * 4); // gap between words
     }
    }
}
void flashSequence(char* sequence)
{
   int i = 0;
   while (sequence[i] != '\0')
   {
    flashDotOrDash(sequence[i]);
    i++;
    }
   delay(dotDelay * 3); // gap between letters
}
void flashDotOrDash(char dotOrDash)
{
   digitalWrite(ledPin, HIGH);
   if (dotOrDash == '.')
   {
    delay(dotDelay);
    }
   else // must be a -
    {
     delay(dotDelay * 3);
     }
digitalWrite(ledPin, LOW);
delay(dotDelay); // gap between flashes
}
Enumeration and pointer data 枚举和指针数据
枚举是 C 语言中的一种基本数据类型,用于定义一组具有离散值的常量,它可以让数据更简洁,更易读。枚举类型通常用于为程序中的一组相关的常量取名字,以便于程序的可读性和维护性。
定义一个枚举类型,需要使用 enum 关键字,后面跟着枚举类型的名称,以及用大括号 {} 括起来的一组枚举常量。每个枚举常量可以用一个标识符来表示,也可以为它们指定一个整数值,如果没有指定,那么默认从 0 开始递增。
如果不使用枚举定义一组星期的别名如下
#define MON  1
#define TUE  2
#define WED  3
#define THU  4
#define FRI  5
#define SAT  6
#define SUN  7
使用枚举定义
enum DAY
{
      MON=1, TUE, WED, THU, FRI, SAT, SUN
};
指针数据
C 语言的指针既简单又有趣。通过指针,可以简化一些 C 编程任务的执行,还有一些任务,如动态内存分配,没有指针是无法执行的。所以,想要成为一名优秀的 C 程序员,学习指针是很有必要的。
正如您所知道的,每一个变量都有一个内存位置,每一个内存位置都定义了可使用 & 运算符访问的地址,它表示了在内存中的一个地址。
#include <stdio.h>

int main ()
{
    int var_runoob = 10;
    int *p;              // 定义指针变量
    p = &var_runoob;

   printf("var_runoob 变量的地址: %p\n", p);
   return 0;
}版权声明:本文为原创文章,版权归donstudio所有,欢迎分享本文,转载请保留出处!


